Guide: Push any data on to the blockchain forever

Admittedly, hacks for forcing arbitrary data on to the Bitcoin blockchain is not without ethical considerations. The blockchain, Bitcoin’s public ledger, has one job – and that is to maintain a public database of every single transaction so that Bitcoin users can verify them without having to trust any centralized service. It is therefore very important that the blockchain isn’t bloated with arbitrary data of little or no use since all full nodes must maintain a full copy of the entire blockchain from the genesis block back in 2009 until right now.
Ideas and methods for pushing arbitrary data on to the Blockchain is not a new thing. One famous example is that an image of Nelson Mandela was successfully included in a single block in 2013. This may seem cute and harmless, but “everyone’s doing it” is not the desired outcome, due to the scalability problem: Full nodes must store a complete copy of blockchain and query and verify it around the clock, and if the entire blockchain becomes too large (i.e. takes too much storage space), fewer and fewer people will be able and willing to maintain full nodes, which are essential for the survival of Bitcoin. At the time of writing, the size of the Bitcoin blockchain is more than 280 GB.
As said, several different methods have been devised to force arbitrary and non-transaction related data on to the blockchain, often in the form of plain text messages. In a 2017 academic paper, several of these are discussed in detail. If you search the web for guides and how to do it exactly however, you get tons of hits and a number of technically demanding methods. Also, many tend to describe more or less vaguely how to do it, but we couldn’t find a fail-safe step-by-step guide that the slightly above average Bitcoin user could follow, which prompted us to publish a simple method.
Our method may not be the most elegant. We also do not write much about what is actually going on under the hood. Intentionally. This gets the job done and is easy to follow, and that is why you are reading this, right? You want the answer and not another wall of text of technical details. We will be using a so-called operator in the Bitcoin script language called OP_RETURN, that’s all (or even a little more) that you need to know for now.
Let begin by taking a look at the end result, what’s so cool about it and go from there and explain how you can do it (from this confirmed transaction):
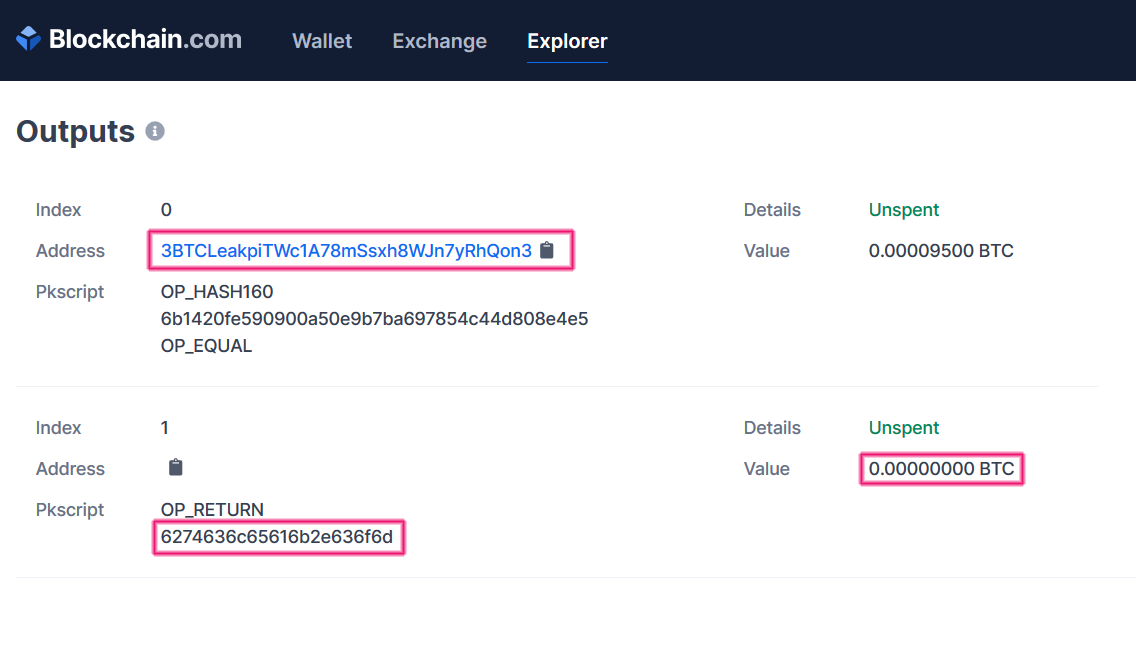
Hidden message in Bitcoin blockchain
So, this is an incoming transaction to this page’s public address (bottom of this page). But it is not a standard transaction, as it contains an extra output to a hexadecimal string “6274636c65616b2e636f6d”; also note that this “address” (it isn’t really an actual address) received zero BTC. What’s the big deal? Well, that hex string is easily converted to ASCII-letters (readable characters), and if you do that, you will notice that it translates to the URL for this page – “btcleak.com“. We are forever imprinted on the blockchain!
Do you wanna know how we did it? These are the steps we took:
Step 1 – Preparing a transaction
Alright, so in order to reproduce this, you need a legacy address and its private key. Legacy is the old kind that starts with “1”. You can do it with multisig and segwit addresses too, those that begin with “3” or “bc1”, but it would require more steps and we decided to keep things as simple as possible. So we created the following temporary key pair (if you haven’t noticed already, we love exposing used private keys)
1GfvwvdSZSeNUnS7Pus3vdpqHjxJXSBBVw
and sent 10k satoshi there. At a low transaction fee, another favorite of ours. For good measure, we set it to RBF (replace by fee).
Step 2- Creating raw transaction offline
We’ve been over this: never expose your private keys online (unless you intend to burn them). We downloaded a local copy of coinb.in, which is a fantastic tool for creating custom transactions in your own browser. You can, of course, use their online service, but we would strongly advise you to download a local copy of the webpage and run it locally from your computer (you should see a download link at the bottom of their page).
The user interface is far from optimal, and you have to search around a bit to understand how to get things right so you don’t accidentally spend all your coins back to miners. Or simply continue reading here.
From this point, we are assuming that you have a legacy address, its private key and that it is funded just once with enough coins for a successful transaction, but maybe not with too much more, because you don’t want to go bankrupt if you mess up. 10k satoshi seems like a reasonable amount.
The first thing you do it in the top menu click “New” followed by “Transaction”. It will take you to a page that asks you for your WIF (your private key); this is the scariest part. The offline version is safe, to the best of knowledge. Paste your WIF and press “Load”. After a second or two, it should display your public address. Make sure it corresponds to the address you are using for this experiment.
Also, click the “Inputs” tab to make sure all fields are populated with the required information to construct a transaction; “Transaction ID”, “Script” and “Amount” should be filled out automatically for you. If you use a legacy address such as the one we just described, the amount should be 0.0001 BTC. Don’t make any changes here. Keep an eye on the “Transaction fee” box; for now, it should say 0.00010000 BTC, we will get back to that.
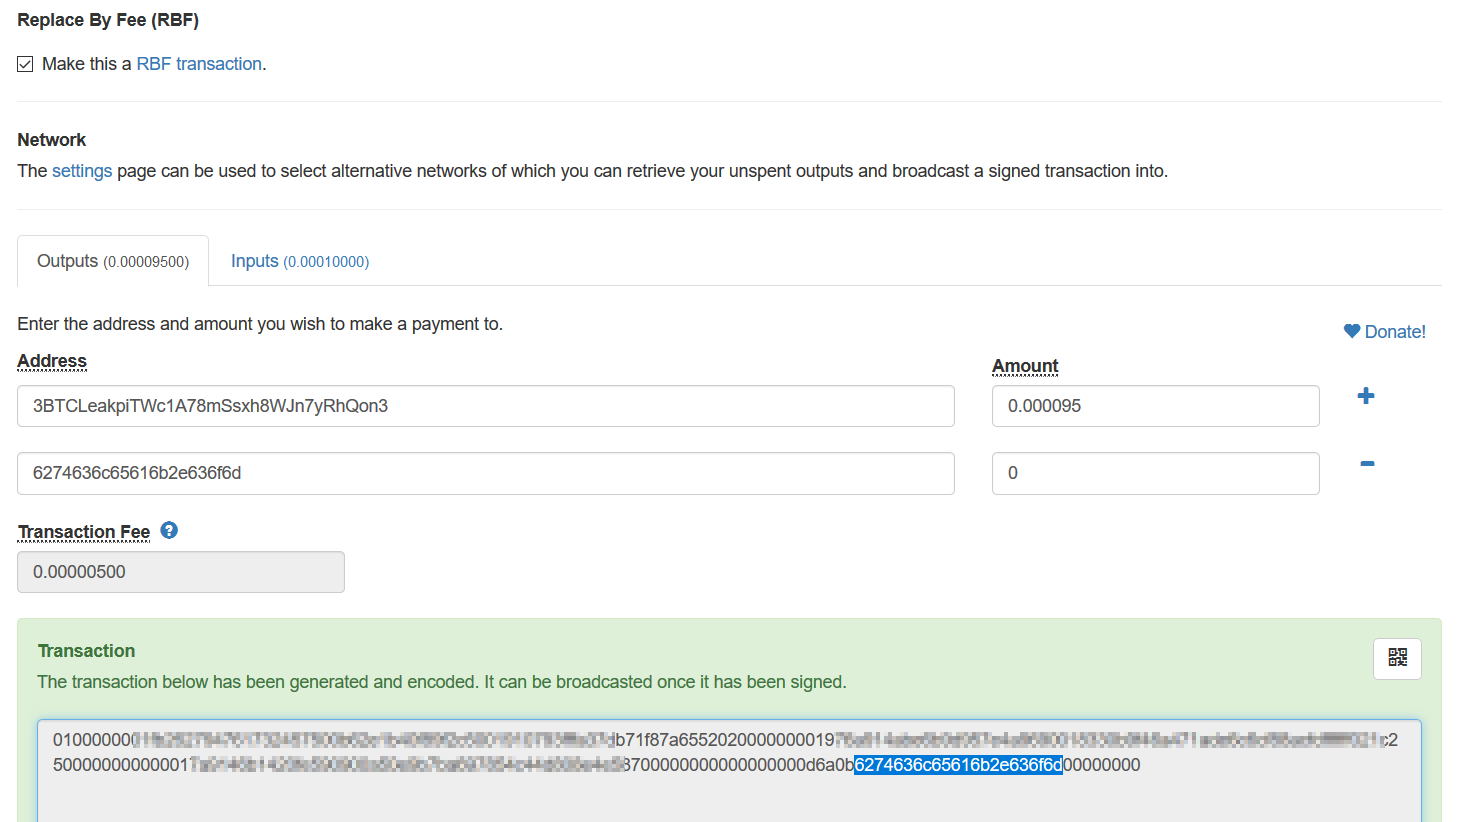
You must then click “Advanced options” once, and make a few changes. Make sure “Clear Inputs” and “Null Data” are both ticked. The latter is the magic ingredient that allows us to pad a transaction with arbitrary data. “Lock time” should be 0 and “Replace By Fee (RBF)” ticked too.
Almost there. Click the “Outputs” tab. Fill out the first row with a public address to which you want to send. Multisig and segwit addresses are OK here. We entered “3BTCLeakpiTWc1A78mSsxh8WJn7yRhQon3” in the first address row (and you are welcome to use it too). Then we changed the amount to 0.000095 BTC. Pay close attention to the “Transaction fee” after doing this; if done correctly it should say 500 satoshi, which is a low but OK transaction fee.
Then, and this is when you finally get the chance to enter arbitrary data, press the plus sign to the right of the first address row, to open up a second. Fill this with ANY data in hexadecimal format. The limit is 40 bytes, i.e. 80 hex characters. In our own example, we used a tool to convert plain text in ASCII to hex – which is the “standard” (rather “not-so-standard”) way of hiding plain text in the blockchain. Use your imagination! And here is the really cool part, in the second “Amount” box, just enter 0. You don’t want to send coins that are never again retrievable by anyone. It is quite fantastic, and a little frightening, that the amount is allowed to be 0, but we’re happy with it for now.
Again, check that the transaction fee is in the 500 satoshi range. All good? Press “Submit”. And don’t worry, you are NOT sending anything yet. If something needs changing, it’s not too late after you press “Submit” on this page. If done right, you should see a new box pop up with a long hexadecimal string. It should look something like this.
Bitcoin raw transaction
This is your so-called raw transaction. Copy it to the clipboard.
All the hard work is done, the following steps are easy peasy. Almost there!
Step 3 – Verifying and signing the transaction
Head over to the “Verify” tab. You don’t have to do anything here other than noticing that all looks good; if you get an error message, something needs fixing in the previous step. (A common beginner’s mistake is trying to spend from an address that isn’t funded; it won’t work and you will not make it past this step.)
Click the “Sign” tab. You are again asked for your private key, which is necessary to sign the transaction. Paste it and press “Submit”. This will give you a new hex string, which is the signed transaction, now with indisputable proof that you control the coins you’re spending. (No, you’re not exposing your private key here, it cannot be reconstructed from a signed transaction.)
Step 4 – Broadcasting the transaction
This is the best part. Click the “Broadcast” tab, followed by “Submit”. Boom, done!
Within a second or two, you should see a green box containing the transaction id, even with a link to a common blockchain explorer, so that you immediately can head over there and see with your own eyes that the transaction indeed is in the mempool and is propagating through the network.
Depending on the transaction fee, 500 satoshi is usually too little for inclusion in the very next block, it will take some time before the transaction is verified. Not too long, though, maybe half an hour or so.
Step 5 – Celebrate
Save the link to the transaction id on the blockchain. You have successfully included a secret message in the blockchain, and it will never go away.
Comments or questions?
One more thing!
Consider the donation address at the bottom of the page. We re-invest all contributions into new projects for btcleak.com. Help us create new content and remain ad-free forever. Thank you.
About 12 hours after publishing, we found a much simpler and elegant method. It allows you to skip the intermedia legacy address (send to/from ANY address).
In Electrum, “Tools” and “Send to many”. On the first row input your own address (our ours), followed by a comma and an arbitrary amount (really doesn’t matter, you will get it back if you’re sending to self, but of course you must have it covered).
On the second row:
OP_RETURN [my hexstring], 0
Where [my hexstring] can be any hexadecimal string up to 80 characters (40 bytes); we again pushed “btcleak.com” converted from ASCII to hex.
Like so
Here is our new transaction.
We spent 279 satoshi in total. A reasonable fee!
Cool, huh?
[…] There are other ways to push arbitrary data, such as a hash and a timestamp, on to the blockchain, for example this way […]
How?